Marble Sort Level 17 Walkthrough & Solution
Marble Sort Level 17 walkthrough: a 3x4 Mystery Box wall flanked by two Tunnels. Sacrifice the Dark Reds on the belt, dig out White, then crack the gray wall.
Levels · 17

Marble Sort Level 17 Walkthrough & Solution
Level 17 Board Overview: The Giant Gray Wall
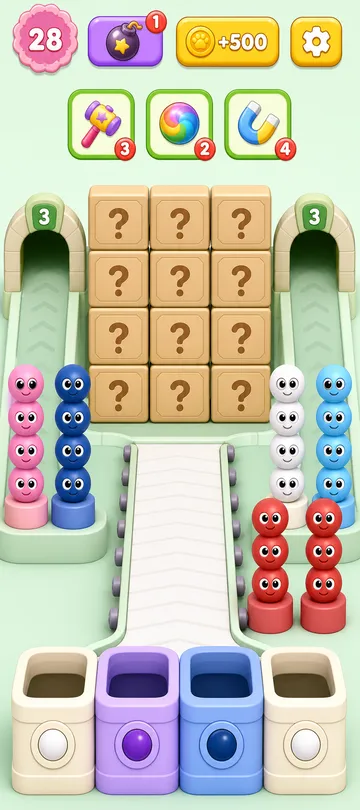
Level 17 puts a fortress on your screen. The entire upper-middle of the Top Tray is a solid 3x4 block of Mystery Boxes — twelve hidden marbles you know nothing about. Two Tunnels stamped with a 3 flank the wall on the left and right, locked for now.
Everything you can actually play with sits at the bottom corners of the tray. Bottom left: a Pink box with a Dark Blue box beside it. Bottom right: twin Dark Red boxes side by side, with a White box and a Light Blue box visible above them.
Now check your active bottom Boxes: White, Purple, Dark Blue, White. Two of your four starting Boxes want White — and the only White in sight is barricaded behind those twin Dark Reds, which no active Box wants. Classic bait-and-switch. You are going to have to park marbles you cannot use to reach the ones you need.
The Trap in Marble Sort Level 17
This level is an excavation job, and the traps are all about tap order:
- The Dark Blue on the bottom left is your one clean opening — an active Box is waiting for it.
- The twin Dark Reds on the bottom right are the gate. A Dark Red Box exists, but it is stuck in the second row. Tapping the twins means feeding them to the Conveyor Belt as sacrifices.
- The White box behind the Dark Reds is the real prize. Two front-row Boxes are starving for it, and you cannot reach it without moving the gate first.
- The Mystery Box wall is the late-game minefield. Reveals that match live Boxes are free clears; reveals that do not will choke your belt if you tap them blindly.
- The two Tunnels stay quiet until the wall starts falling — then the left one dumps a long Yellow chain you have to absorb fast.
Speed loses here. The run is won by peeling the edges first and never touching the middle before it is safe.
Marble Sort Level 17 Step-by-Step Walkthrough
The opening six taps are scripted. After that, the board starts talking back.
Opening: crack the corners and dig out White
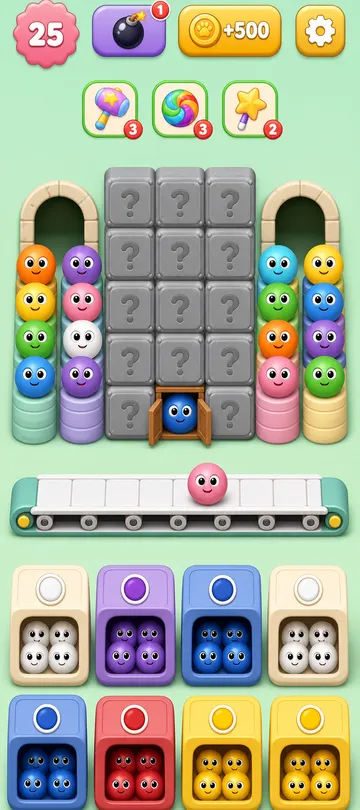
- Tap the Dark Blue box on the bottom left of the tray. It drops straight into the active Dark Blue Box — one front slot gone.
- Tap both Dark Red boxes on the bottom right and send them to the Conveyor Belt. Yes, on purpose. They sit there as parked sacrifices.
- With the Dark Reds gone, tap the Dark Blue box that was hiding behind them to finish the Dark Blue Box.
- Tap the White box on the right column into one of your White Boxes.
- Tap the Purple box on the left side into the active Purple Box.
- Tap the Pink box on the bottom left and park it on the belt next to the Dark Reds.
Mid-game: the board shifts and the wall cracks
The front Box row is gone, and the second row slides up demanding Dark Blue, Dark Red, Yellow, and Yellow.
- Do nothing — the Dark Reds you parked flush automatically into the new Dark Red Box. Belt pressure relieved.
- Now start on the Mystery Box wall, one tap at a time. Pop a single box on the wall’s bottom edge and read the color before doing anything else.
- If the reveal matches a live Box — Dark Blue or Yellow — send it down and clear the space.
- If it reveals a dead color like Light Blue or Orange, leave it sitting. Blind-tapping the wall is the fastest way to drown the belt.
Late game: the Tunnel spill and the mop-up
- The left Tunnel finally bursts and spills a huge Yellow chain onto the board. Stay calm — two Yellow Boxes are live and waiting. Route the whole chain straight down to decompress the center.
- The final Box row reveals itself: Light Blue, Orange, and Pink. Your parked Pink from step 6 flushes into the Pink Box on its own.
- Clean up the remaining Light Blue and Orange boxes from the top right and the ruins of the wall. Slow, deliberate taps — the level is already beaten.
Level 17 Tips Recap
- The twin Dark Reds are a gate, not a trap — parking them on the belt is the intended play.
- Open the Mystery Box wall one tap at a time and read every reveal before committing.
- When the left Tunnel spills Yellow, the two live Yellow Boxes make it a gift, not a crisis. Feed them immediately.
Related Articles
blog
Marble Sort Mystery Box Guide: Reveal Before You Tap
Learn how the Marble Sort Mystery Box works: how it reveals its color as it moves forward, when it's safe to tap, and how to dodge the wrong-color trap.
blog
Marble Sort Tunnel Guide: Release Boxes Safely
Learn how the Marble Sort Tunnel works: what the number really means, how to release stored boxes safely, Timeout Tunnel rules, and smart clearing strategy.
blog
Marble Sort Video Walkthroughs — All Levels on YouTube
Every Marble Sort level 1-20 solved on video — the complete walkthrough series by Rock Gaming Channel, embedded level by level with links to the written guides.
Was this helpful?
Thanks for the feedback!