Marble Sort Level 8 Walkthrough & Solution
Marble Sort Level 8 walkthrough: dodge the front-row Red bait, open the cross from the wings, and clear the Mystery Box cap with our step-by-step solution.
Levels · 8

Marble Sort Level 8 Walkthrough & Solution
Level 8 Board Overview: The Red Wall Cross

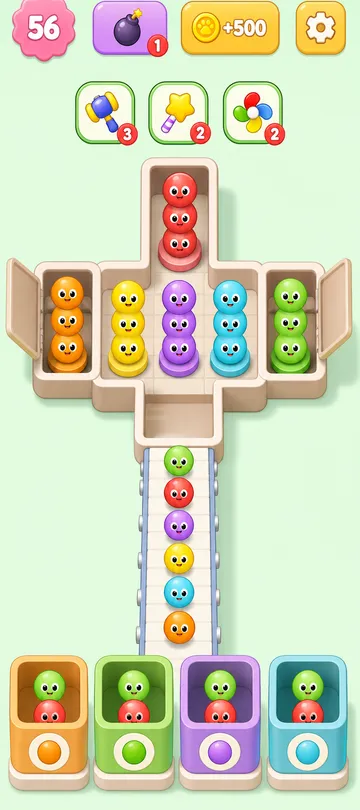
Level 8 wants you to lose on the first tap. The Top Tray is built like a thick cross: a visible 3x3 grid of color clusters in the center, Mystery Boxes stacked on both wings, and three more Mystery Boxes capping the top. Your colors are Red, Orange, and Green, with Yellow, Purple, and Cyan mixed into the deeper rows.
The front of the center grid is a solid barricade of three Red clusters. Now check the bottom Boxes: the active layer is three Orange Boxes and one Green Box. There is not a single Red Box open. The whole opening is a test of whether you can leave three free, tempting blocks untouched.
The Trap in Marble Sort Level 8
Break the board down before you move:
- Center grid, front row: Red, Red, Red — pure bait.
- Center grid, middle row: Yellow, Purple, Cyan.
- Center grid, back row: Cyan, Green, Orange.
- Wings and top cap: Mystery Boxes hiding your actual starting colors.
The bottom columns are stacked deep and they dictate the whole run. Column one runs Orange, Green, Red, Cyan. Column two runs Orange, Green, Red, Yellow. Column three is Orange, then three Reds. Column four is Green, Red, Red, Purple.
Read that carefully: the Red Boxes all live in the second and third layers. Tap the front Reds now and they flood the Conveyor Belt with nowhere to go — instant jam, run over. Your Orange and Green have to come from the wings first.
Marble Sort Level 8 Step-by-Step Walkthrough
Opening: hit the wings, not the wall
- Leave all three Red clusters alone. They do not move until the board says so.
- Tap the Mystery Boxes on the far-left and far-right wings of the cross.
- They flip into the Orange and Green marbles the active layer is begging for.
- Feed the three Orange Boxes and the single Green Box until the entire top layer clears.
- The columns shift up, and the second layer surfaces — now heavy on Green and Red.
Mid-game: the Red wall finally falls
- Now tap the three Red clusters at the front of the Top Tray. Red Boxes are exposed and waiting, so the belt flushes them straight home without jamming.
- Clearing the barricade exposes the middle row of the grid: Yellow, Purple, and Cyan.
- Watch the bottom columns for the Cyan and Yellow Boxes rising from the depths, and tap the matching clusters as soon as each one is active.
- Work through the back row — Cyan, Green, Orange — holding any odd color in the tray until its Box pops up.
Cleanup: the top cap
- Make sure your Conveyor Belt has about five free slots before touching the top of the cross.
- Tap the three horizontal Mystery Boxes capping the grid.
- Route the reveals into the deepest remaining Boxes — mostly Purple, Yellow, and Cyan at this point.
- Prioritize any straggling Purple or Yellow Boxes on the right side, then sweep the last loose marbles to finish.

Level 8 Tips Recap
- First taps belong to the wing Mystery Boxes, never the Red front row.
- Red only becomes safe after the first Orange and Green layer fully clears — one layer makes all the difference.
- Empty your belt before opening the top cap. Three unknown colors at once is how late-game jams happen.
Related Articles
blog
Marble Sort Mystery Box Guide: Reveal Before You Tap
Learn how the Marble Sort Mystery Box works: how it reveals its color as it moves forward, when it's safe to tap, and how to dodge the wrong-color trap.
blog
Marble Sort Video Walkthroughs — All Levels on YouTube
Every Marble Sort level 1-20 solved on video — the complete walkthrough series by Rock Gaming Channel, embedded level by level with links to the written guides.
level
Marble Sort Level 1 Walkthrough & Solution
Marble Sort Level 1 walkthrough: dodge the checkerboard bait, tap the front Yellow blockers first, and dig out the buried Light Blue clusters step by step.
Was this helpful?
Thanks for the feedback!