Marble Sort Level 23 Walkthrough & Solution
Marble Sort Level 23 walkthrough: sacrifice belt space to the White block, force the double-Pink column, and dig out Black with our step-by-step solution.
Levels · 23

Marble Sort Level 23 Walkthrough & Solution
Level 23 Board Overview: The White Block Hostage Situation
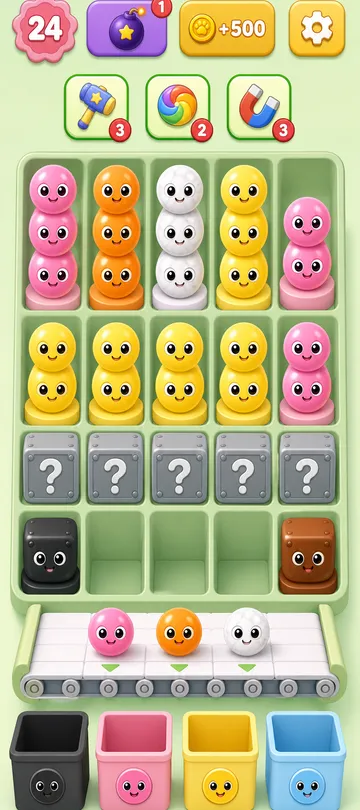
Level 23 is famous for feeling impossible in the first ten seconds. The Top Tray is a dense 3x5 grid. Its front row is jammed with Pink, Orange, and White blocks; row two holds two Yellows and a Pink; behind that sits a full row of Mystery Boxes, and row four hides a Black block on the left and a Brown block on the right.
Now the bad news from below. The four receiver columns open with Black (column 1), Pink (column 2), Yellow (column 3), and Light Blue (column 4). Scan the Top Tray: there is no exposed Black block and no Light Blue block anywhere. Half your receivers are asking for marbles you cannot even see yet.
The dominant colors are Pink, Orange, Yellow, and Black — but the whole level pivots on a single White block sitting in the bottom-right of the tray, directly on top of the Pink block you need most.
The Trap in Marble Sort Level 23
Column 2 is the only door into this level, and it is a narrow one. Its stack runs Pink, then Pink again, then Orange. The front row hands you one Pink block on the far left — that covers the first Box. But the second Pink block is buried in row two, with that homeless White block standing guard over it.
Here is the nasty part: there is no White Box. Not in the front row, not coming soon. The only way forward is to deliberately drop nine White marbles onto your Conveyor Belt and let them sit there — over half your belt space, gone on purpose — just to dig out one Pink block.
And Light Blue? Pure bait. Column 4 demands it from move one, but no Light Blue block exists in the front half of the board. Any tapping around trying to fish for it just clogs the belt you are already spending on White.
Marble Sort Level 23 Step-by-Step Walkthrough
The opening belt management is brutal but scripted. Follow it exactly.
Opening: buy the second Pink with belt space
- Tap the bottom-left Pink block. It fills the first Pink Box in column 2.
- Column 2 immediately asks for a second Pink. That block is trapped behind the White one.
- Drop the bottom-right White block onto the Conveyor Belt. No White Box exists — these nine marbles are parked there as a calculated sacrifice. After this tap, do not drop any other unmatched color.
- Tap the newly exposed Pink block on the right side. It slides past the parked Whites and clears the second Pink Box in column 2.
- Column 2 now shows an Orange Box. Tap the bottom-middle Orange block to clear it — the entire front row of the tray is finally gone.
Mid-game: Yellow, then the Mystery row flips
Your belt is still hostage to the White marbles, so stay disciplined.
- Row two now exposes two Yellow blocks. Tap the left Yellow into the Yellow Box at the top of column 3.
- Clearing the front of row two fully exposes row three — a full line of Mystery Boxes. The moment they are uncovered they flip and show their true colors.
- Match whatever the Mystery row reveals, instantly, into columns 2 and 3. A revealed color with an open Box should never sit on the belt.
- Keep grinding column 3 (a Pink Box hides under its Yellow one) until a White Box rotates to the front. The second it appears, your nine parked White marbles finally clear and your belt is free again.
Cleanup: unlock the stalled left side
- Clearing the Mystery row exposes row four, which holds a Black block on the far left. Tap it — the Black Box that has frozen column 1 since the start finally clears.
- Column 1 rolls over to a Brown Box. The right end of row four conveniently holds a Brown block. Match them.
- With columns 1 and 2 pushed down, the back rows reveal Light Blue blocks for column 4’s long-waiting Light Blue Box. Keep the belt empty for these last drops and finish clean.

Level 23 Tips Recap
- The White sacrifice is not optional — it is the only route to the second Pink. Commit to it and protect the remaining belt space.
- Light Blue is a ghost for the entire first half of the level. Never tap around hunting for it.
- Once the Mystery row flips, sort reveals immediately; your belt cannot afford tenants until the White Box appears.
Related Articles
blog
Marble Sort Mystery Box Guide: Reveal Before You Tap
Learn how the Marble Sort Mystery Box works: how it reveals its color as it moves forward, when it's safe to tap, and how to dodge the wrong-color trap.
blog
Marble Sort Video Walkthroughs — All Levels on YouTube
Every Marble Sort level 1-20 solved on video — the complete walkthrough series by Rock Gaming Channel, embedded level by level with links to the written guides.
level
Marble Sort Level 1 Walkthrough & Solution
Marble Sort Level 1 walkthrough: dodge the checkerboard bait, tap the front Yellow blockers first, and dig out the buried Light Blue clusters step by step.
Was this helpful?
Thanks for the feedback!