Marble Sort Level 2 Walkthrough & Solution
Marble Sort Level 2 walkthrough: survive the 14-slot Conveyor Belt limit, park one Yellow block, and burn through the Green and Red Boxes without overflowing.
Levels · 2

Marble Sort Level 2 Walkthrough & Solution
Level 2 Board Overview: The Belt Overflow Trap
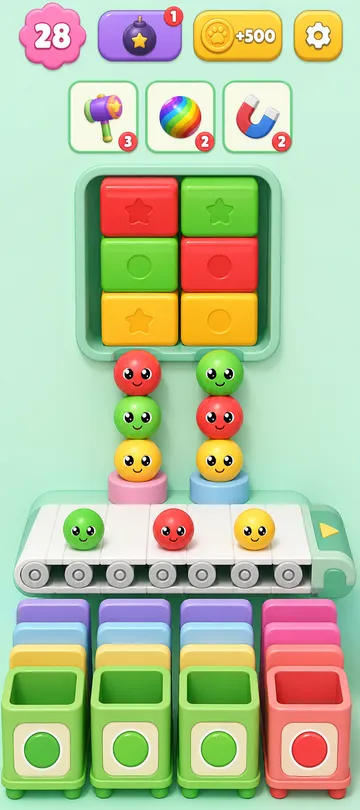
Three colors this time — Green, Red, and Yellow — stacked in a Top Tray that’s just two columns wide and three blocks tall. Every block holds nine marbles, and that number matters more than anything else on this board.
The left column runs Red, Green, Yellow from top to bottom. The right column runs Green, Red, Yellow. Notice the bottom row: the only blocks you can touch at the start are the two Yellows. Gravity says nothing above them moves until they’re gone.
Now check the receiver Boxes. Four columns, four deep, and not a single Yellow Box anywhere near the front — Greens and Reds cover the front line, while every Yellow Box is buried at the very back. Your Conveyor Belt holds 14 slots. One block is 9 marbles. Two blocks is 18. You see where this is going.
The Trap in Marble Sort Level 2
The board dares you to tap both Yellow blocks to “get them out of the way.” Do it and 18 marbles hit a 14-slot belt. Overflow, instant fail, no recovery.
- Right column: your working column. Yellow on the bottom, then Red, then Green — and the bottom Boxes happen to want exactly Red and Green up front.
- Left column: same shape in reverse order, but touching it early is suicide. That second Yellow is the trap itself.
- Bottom Boxes: the front layer is three Greens and a Red, with Reds stacked behind and all four Yellows pinned at the back of their columns.
So the plan writes itself: sacrifice nine belt slots to exactly one Yellow block, then race down the right column feeding Red and Green Boxes until the front wall cracks and a Yellow Box finally shows up to drain your parked marbles.
Marble Sort Level 2 Step-by-Step Walkthrough
Tapping order is everything here. No freestyle.
Opening: one Yellow, then dig the right column

- Tap the bottom-right Yellow block. Nine marbles flood the belt and just sit there. That’s fine — that’s the plan. Hands off the left Yellow.
- Tap the middle-right Red block that you just exposed. It pours into the front Red Box in column two and keeps going into the second Red Box behind it.
- Tap the top-right Green block. These marbles smash through the front Green Boxes in columns one, three, and four.
- The front wall collapses, and a Yellow Box slides into the active row. Your nine parked Yellow marbles get sucked in automatically. Belt empty. Breathe.
Cleanup: mirror the dig on the left
- Tap the bottom-left Yellow block onto the clean belt.
- Tap the middle-left Green block. It finishes the Green Boxes stacked deep in column four.
- Tap the top-left Red block. It hunts down the Reds waiting in the middle of columns one and three.
- Nothing left in the tray. The remaining Yellow Boxes line up at the back and the belt drains into them on its own. Done.

Level 2 Tips Recap
- Know your belt capacity — one block is safe, two of the same bait color is a loss.
- A parked block isn’t a problem if you can see the Box that will eventually eat it.
- Work one column top to bottom before starting the next; splitting your dig jams the belt.
Related Articles
blog
Marble Sort Video Walkthroughs — All Levels on YouTube
Every Marble Sort level 1-20 solved on video — the complete walkthrough series by Rock Gaming Channel, embedded level by level with links to the written guides.
level
Marble Sort Level 1 Walkthrough & Solution
Marble Sort Level 1 walkthrough: dodge the checkerboard bait, tap the front Yellow blockers first, and dig out the buried Light Blue clusters step by step.
level
Marble Sort Level 10 Walkthrough: Tunnel & Pink Bait
Marble Sort Level 10 walkthrough: dodge the double Pink bait, tick the Tunnel countdown down from 3, and survive the Light Blue wall step by step.
Was this helpful?
Thanks for the feedback!