Marble Sort Level 139 Walkthrough & Solution
Marble Sort Level 139 walkthrough: unmask the mystery tiles, ride the conveyor arrows, and feed the Green, Pink, and Yellow boxes before Brown and White arrive.
Levels · 139
Levels 460–460
Levels 487–487
Levels 500–500
Levels 517–517
Levels 550–550

Marble Sort Level 139 Walkthrough & Solution
Level 139 Board Overview: Mystery Tiles Above, Arrows Below
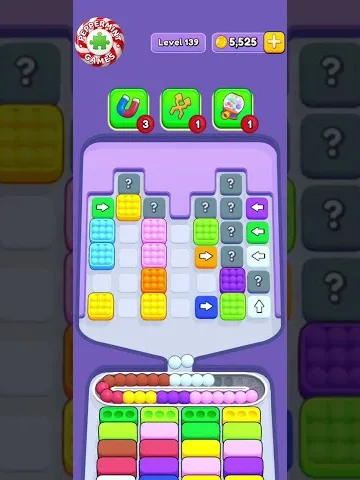
Level 139 opens with the top two rows of a seven-column tray covered by thirteen mystery tiles. Only the bottom four rows are visible when you start, and they hold a scattered mix of Green, Yellow, Blue, Pink, Orange, Purple, and White. Nine of those visible marbles are conveyor blocks marked with arrows — Green, Orange, Purple, and White — and each one shifts the row it sits in when it triggers.
The receiver queue starts with Green, Pink, Green, and Yellow boxes in the front row, and the conveyor feed opens by delivering Brown and White. Neither Brown nor White has a box near the front of the queue, so the opening is a mismatch test: keep the Green, Pink, and Yellow boxes fed while the early Brown and White marbles wait their turn on the belt.
The board grows as you play. Front boxes complete, the queue advances to White and Brown, the mystery tiles flip to reveal what was hidden, and a full run of four Blue marbles comes down in one push. The endgame narrows to four targets: Brown, Light Blue, Yellow, and Purple.
The Trap in Marble Sort Level 139
- Mystery tiles hide the top half. Thirteen question-mark tiles cover the top two rows, so you cannot plan a full column from the start. Every reveal changes the board, and committing to a half-seen column can bury a marble you need later.
- Brown and White arrive with nowhere to go. The feed starts by dropping Brown and White, but the front boxes ask for Green, Pink, and Yellow. Tap the early Brown and White and your belt jams before the first box clears.
- Conveyor arrows move whole rows. The arrow blocks are not static marbles — when they activate they slide the rest of their row sideways or upward. A single drop can cascade into a column you never touched.
- The queue lags the supply. Orange, Purple, Blue, and Red boxes sit deep in the queue while their marbles are already on the board. Dump them early and you carry them on the belt through the entire opening.
Marble Sort Level 139 Step-by-Step Walkthrough
Patience beats speed. Follow the release order.
Opening: feed the front row
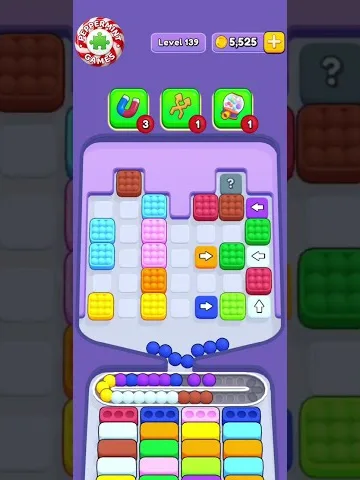
- Confirm the front boxes: Green, Pink, Green, and Yellow. Those four colors are your only legal targets at the start.
- Tap the three Yellows sitting at the bases of the left-center columns into the Yellow box.
- Feed the Greens on the left and center columns — column 1’s top Green and the Green pair on column 5 — into the two Green boxes.
- Move the Pinks in column 2 and the Blues in columns 1 and 5 into their front boxes to keep the row clearing.
- Leave the Brown and White marbles sitting on the conveyor. Their boxes are not active yet.
- Do not touch Orange, Purple, or the arrow blocks in the opening — none of their boxes are in front.
Midgame: the mystery tiles flip
Once the first Green, Pink, and Yellow boxes clear, the queue advances and the hidden rows start revealing themselves.
- Re-scan the tray after every reveal. The mystery tiles above the left and right columns flip in groups, and a new column can become playable mid-turn.
- When the White and Brown boxes reach the front row, start spending the White and Brown marbles that have been waiting on the conveyor — this is the payoff for the patient opening.
- Handle the conveyor arrows deliberately. The Green right-arrow on column 1 and the Orange right-arrows on columns 2 and 3 push rows to the right; the Purple left-arrows on column 6 and the White arrows on the far right push the other way. Drop a marble only when the arrows move the row in the direction you want.
- Watch for the Blue run. A set of four dark Blue marbles comes down together — have the Blue box in front before you release the first one, then feed all four in one push.
- Clear the heavy Green stack on the center-left as its box cycles forward, and keep emptying White and Brown into their active boxes.
Cleanup: close out the last four boxes
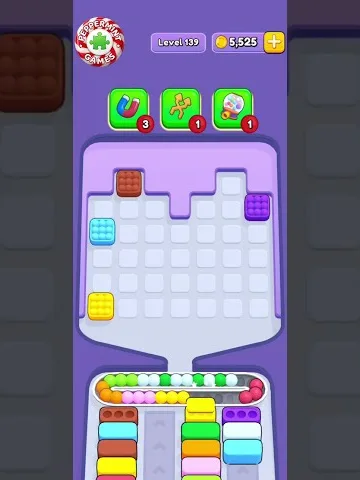
The board shrinks to two tray columns and a short conveyor feed, with Brown, Light Blue, Yellow, and Purple left to finish.
- The final targets are Brown, Light Blue, Yellow, and Purple. Check the count on each box before you feed it — some need three, some need four.
- Play the two remaining columns against the conveyor supply. The left column carries Red, Light Blue, Brown, and Yellow; the right column holds Yellow, Green, Orange, Pink, and Light Blue.
- Spend the conveyor’s White and Green groups first to keep the belt moving, then work through the Orange, Pink, Yellow, and Red that finish the feed.
- Let the front boxes do the pulling. A marble only needs to reach an active box, so do not reshuffle a column that already matches — just feed the stragglers as their boxes come forward.
Level 139 Tips Recap
- The top two rows start hidden — re-scan the board after every mystery-tile reveal before you commit a drop.
- Brown and White are the first marbles on the conveyor but have no active boxes. Leave them waiting until the queue cycles.
- Conveyor arrow blocks shift entire rows. Drop into a column only when its arrows push the marbles where you want them.
- Save Brown, Light Blue, Yellow, and Purple for the final stretch — they are the last four boxes standing.
Related Articles
blog
Marble Sort Mystery Box Guide: Reveal Before You Tap
Learn how the Marble Sort Mystery Box works: how it reveals its color as it moves forward, when it's safe to tap, and how to dodge the wrong-color trap.
blog
Marble Sort Video Walkthroughs — All Levels on YouTube
Every Marble Sort level 1-20 solved on video — the complete walkthrough series by Rock Gaming Channel, embedded level by level with links to the written guides.
level
Marble Sort Level 1 Walkthrough & Solution
Marble Sort Level 1 walkthrough: dodge the checkerboard bait, tap the front Yellow blockers first, and dig out the buried Light Blue clusters step by step.
Was this helpful?
Thanks for the feedback!