Marble Sort Level 393 Walkthrough & Solution
Marble Sort Level 393 walkthrough: tick the numbered blocks to zero, break the armored sword tile, and feed the crate rows in order on this hard late-game board.
Levels · 393
Levels 460–460
Levels 487–487
Levels 500–500
Levels 517–517
Levels 550–550

Marble Sort Level 393 Walkthrough & Solution
Level 393 Board Overview: The Countdown Grid

Level 393 is one of the hardest boards in the run, and it opens as a packed tile-grid tray. The top area is wall-to-wall colored tiles — Blue, Cyan, Lime, Green, Purple, Pink, and Red — with no easy first tap. Between them sit several different obstacles: dark grey numbered blocks showing “2”, one red and one blue numbered block showing “3”, a mint-green tile marked with a crossed-swords icon, and crate-textured Blue and Green tiles scattered through the stack.
In the middle of the screen a funnel feeds marbles down onto the belt, and at the bottom the receiver columns cycle their requests. The opening columns are asking for the Blue, Lime, and Green families, while a healthy supply of Dark Blue, Green, and Purple marbles already rides the funnel. Purple and Pink tiles are scattered across the grid too, but no receiver wants them yet — that gap is the level’s first trap.
The whole board is a patience check. The numbered blocks do not break on one hit: they tick down toward zero every time you feed them, and only clear once they bottom out. The armored sword tile sits in the middle lanes and blocks whatever hides behind it. Solve the level by treating every obstacle as a small chore to complete in order, and by never feeding a color that no open receiver column is asking for.
The Trap in Marble Sort Level 393
The opening grid is rigged to make you dump useless colors onto the belt. Here is the layout:
- Numbered blocks tick, they don’t pop: the “3” and “2” blocks in the middle of the tray each need several feeds before they clear. They are not quick wins — plan around them instead of forcing them.
- The armored sword tile seals the center: that mint-green crossed-swords block has to be broken before the tiles trapped behind it release. Until it falls, the middle of the board is a dead zone.
- Crate tiles hide their colors: the Blue and Green crate-textured blocks sit over real tiles, and you cannot tell what is underneath until the crates break.
- Purple and Pink have no early receiver: the opening columns want Blue, Lime, and Green. Grab a Purple or Pink early and it sits on your belt with nowhere to go.
Marble Sort Level 393 Step-by-Step Walkthrough
Order matters more than speed. Follow the release order.
Opening: work the rim and break the crates
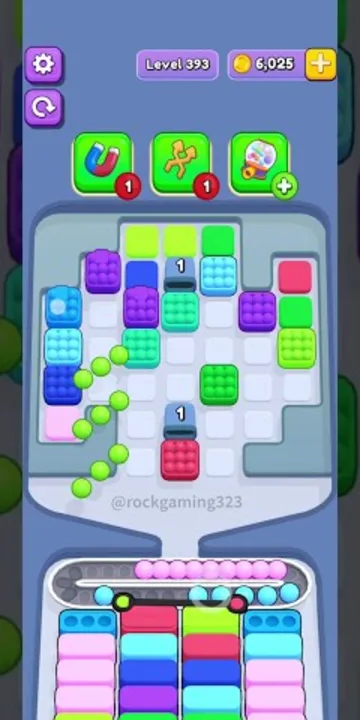
- Start with the tiles the front receiver columns actually want — Blue, Cyan, and Lime are your only safe opening taps.
- Chip the crate-textured Blue and Green tiles apart next. Whatever releases underneath, only drop it if its color still has an open column.
- Leave every Purple and Pink tile alone. They sit in reach on purpose; touching them jams the belt.
- Feed the Dark Blue and Green marbles already waiting in the funnel as their columns come to the front.
- Do not waste taps on the numbered “3” blocks yet — they soak up three feeds each and stall you for nothing at this stage.
Midgame: tick the countdowns and break the shield
Once the early Blue and Lime columns fill, the receiver rack cycles and the board opens up. The new front row asks for Blue, Red, Lime, and Teal, and now the numbered blocks and the armored tile are worth finishing.
- Start feeding the red and blue numbered “3” blocks and the grey “2” blocks — every matching feed ticks them down one step toward zero.
- Break the crossed-swords armored tile as soon as you can reach it; the tiles it was guarding pour out and give the board breathing room.
- The Red tile left in the middle-right of the grid sits directly above a Red receiver column, and a Red marble is next in the funnel — line those two up and drop it.
- Clear the Lime and Teal clusters in batches. Teal sits mid-left and Lime rides the top, so they arrive in short runs once their columns open.
- Keep feeding the Blue tiles as they scatter across the top — Blue columns stay in rotation for most of the level.
Cleanup: sweep the stragglers
By the endgame the grid is mostly empty space. The two numbered carriers have ticked down to zero and sit ready to clear, while the remaining tiles — a mix of Lime, Green, Purple, Light Blue, Dark Blue, and a single Pink — are scattered singles across the tray.
- Feed the last numbered carriers their final tick so they clear and stop blocking the center.
- Handle every remaining tile one at a time: only drop it when its receiver column is asking for that exact color.
- Purple finally gets its turn as the columns cycle through — clear the Purple cluster that was bait all game.
- Play the final Light Blues, Dark Blues, and Greens in order as their columns come around, and the last Pink closes out the level. The board is still live at this point, so keep the belt moving and finish the final columns one by one.

Level 393 Tips Recap
- The numbered blocks count down with every feed and only clear at zero — budget your taps around them instead of forcing them early.
- Break the crossed-swords armored tile as soon as the middle of the grid is reachable; it is the key that opens the center.
- Purple and Pink are bait for the entire opening — no receiver asks for them until the columns cycle late.
- In the endgame every tile is a single: check which column is asking before each tap, and let the rack cycle do the work.
Related Articles
blog
Marble Sort Video Walkthroughs — All Levels on YouTube
Every Marble Sort level 1-20 solved on video — the complete walkthrough series by Rock Gaming Channel, embedded level by level with links to the written guides.
level
Marble Sort Level 1 Walkthrough & Solution
Marble Sort Level 1 walkthrough: dodge the checkerboard bait, tap the front Yellow blockers first, and dig out the buried Light Blue clusters step by step.
level
Marble Sort Level 10 Walkthrough: Tunnel & Pink Bait
Marble Sort Level 10 walkthrough: dodge the double Pink bait, tick the Tunnel countdown down from 3, and survive the Light Blue wall step by step.
Was this helpful?
Thanks for the feedback!