Marble Sort Level 375 Walkthrough & Solution
Marble Sort Level 375 walkthrough: numbered padlocks seal the middle grid, Pink and Yellow lead the queue, and only Light Blue, Dark Blue, and Orange open the board.
Levels · 375
Levels 460–460
Levels 487–487
Levels 500–500
Levels 517–517
Levels 550–550

Marble Sort Level 375 Walkthrough & Solution
Board Overview
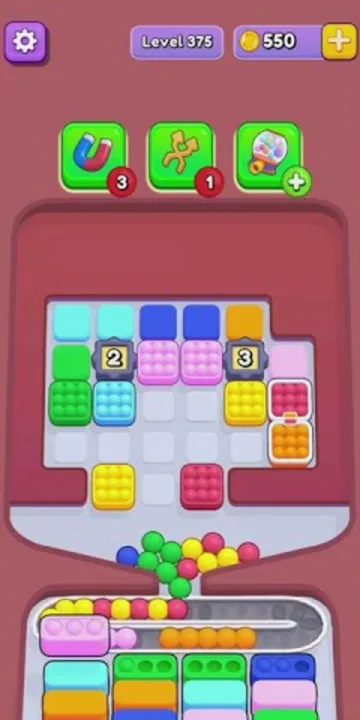
Level 375 is a six-column tile board with the target row printed across the top of the grid: two Light Blue slots, two Dark Blue slots, and a single Orange slot on the right are the only receivers open when the level starts. Beneath them the columns are stacked with honest solid colors — Light Blue and Green on the left, short Dark Blue-over-Pink stacks in the middle, and Orange, Yellow, and Red toward the right — while the conveyor below is already loaded and moving.
The middle of the grid holds the level’s signature piece: two numbered padlock tiles. A padlock marked ‘2’ seals the left-middle area one row below the targets, and a padlock marked ‘3’ seals the right-middle area, with Light Blue and Yellow tiles stacked underneath them. Like every lock tile, they hold their columns shut until they release, and everything trapped beneath comes free at once.
The conveyor is where Level 375 tries to trick you. The belt front-loads Pink and Yellow runs, with Red riding close behind, but none of those colors has an open receiver at the start — the front of the queue is pure bait. Feed the Light Blue and Dark Blue targets first, wait for Orange to cycle live, and never dump a marble that has nowhere to land.
The Trap
- The target row only asks for three colors: two Light Blue, two Dark Blue, and one Orange. Everything else on the board — the Pink, Yellow, Red, and Green tiles — is waiting for a receiver that does not exist yet, and feeding any of it jams the belt.
- The conveyor front-loads the wrong colors: Pink and Yellow runs lead the queue, with Red close behind. The belt will happily serve a full Pink batch while every receiver is asking for Light Blue and Dark Blue.
- The numbered locks seal the mid-depth: padlock tiles marked ‘2’ and ‘3’ sit one row below the targets and lock the columns around them. When one releases, it drops the tiles beneath as a batch, so an unlocked column on a full belt is a jam waiting to happen.
- The left columns top with Light Blue but sit on Green: each left column hides Green tiles under its Light Blue cap. Clear the tops while Light Blue is live, or the column stalls the moment you expose a Green with no target.
Step-by-Step
Opening: feed the three live colors
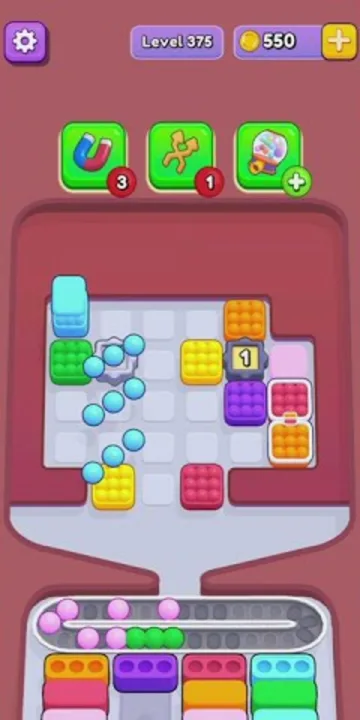
- Feed the two Light Blue targets first — tap the Light Blue tiles capping the left-side columns; Light Blue is the most exposed color on the board.
- Fill the two Dark Blue targets next; Dark Blue tops the short middle-left columns, stacked directly over Pink.
- Leave the numbered lock tiles alone: the ‘2’ and ‘3’ padlocks sit one row below the target row and seal the Light Blue and Yellow tiles underneath them.
- Do not tap into the Pink and Yellow runs riding the front of the conveyor — no Pink or Yellow receiver is open yet, and parking those marbles stalls the solve.
- Work the Orange target from the right side of the grid, where Orange caps the right-middle column just above the ‘3’ lock; match any Orange already riding the belt in the same pass.
- Re-check the target row after every drop — each filled slot cycles the requests, and new colors open as the light tiles clear.
Midgame: unlock the middle columns
- Once the opening targets fill, the belt shifts to long Pink and Green runs; feed them in full matching batches only when their receiver is actually front and center.
- Work the tall Orange and Red stacks top-down, one tile at a time — they are the biggest columns left, and clearing them in order keeps the colors underneath surfacing when their receivers are live.
- Release each numbered lock only when the color trapped beneath matches an open receiver: the drop frees several tiles at once, so time it against the active front row.
- Keep Yellow and Light Blue singles moving as they surface from under the locks; both colors feed steadily through the midgame.
- If the queue cycles a color you cannot place, let it ride to the back instead of forcing it — belt space is the resource this level taxes.
Cleanup: finish the live receivers
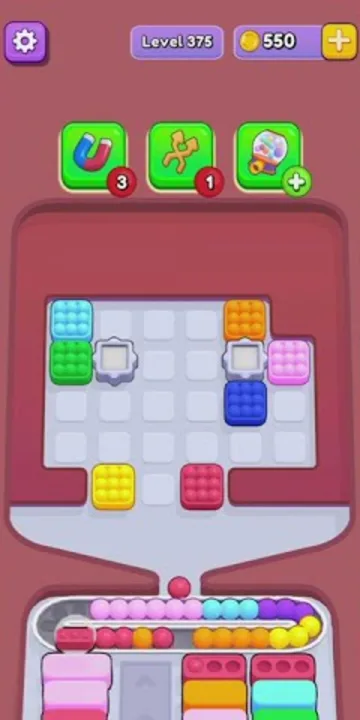
- The final frame still shows the board mid-solve: the grid is only partway cleared, with a few small stacks left and the receivers still taking tiles — keep playing to the front slot.
- Match the queue in the order it arrives — Light Blue, Pink, Yellow, and Orange runs cycle through the endgame — and drop each run into the receiver asking for it.
- Stop touching colors whose receivers have already filled; the level ends the moment the last live slot closes, so ignore the colors that have nowhere left to go.
Tips Recap
- Only Light Blue, Dark Blue, and Orange are live at the start — feed those and let the Pink and Yellow front of the belt ride.
- The numbered ‘2’ and ‘3’ padlocks seal the mid-depth columns; release them only when an open receiver matches what drops underneath.
- The left columns top with Light Blue but sit on Green, so clear the tops early instead of stalling the columns.
- In the endgame the board is still live: match only the front receiver’s color and let the queue cycle the rest.
Related Articles
blog
Marble Sort Dispensers & Locks Guide: Key Order
Learn how Dispensers and Locks work in Marble Sort: find the hidden Key, use Pop-It and Numbered Dispensers without clogging the belt, and beat Level 805.
blog
Marble Sort Locked Pallet Guide: Key Queue Timing
Master the Locked Pallet in Marble Sort: how the key queue works, why keys ignore color, and the timing tricks that stop locked boxes from stalling your run.
blog
Marble Sort Video Walkthroughs — All Levels on YouTube
Every Marble Sort level 1-20 solved on video — the complete walkthrough series by Rock Gaming Channel, embedded level by level with links to the written guides.
Was this helpful?
Thanks for the feedback!