Marble Sort Level 367 Walkthrough & Solution
Marble Sort Level 367 walkthrough: feed visible Reds first, reveal the grey '?' mystery tiles one at a time, and bank the numbered '4' marker for an open receiver.
Levels · 367
Levels 460–460
Levels 487–487
Levels 500–500
Levels 517–517
Levels 550–550

Marble Sort Level 367 Walkthrough & Solution
Board Overview
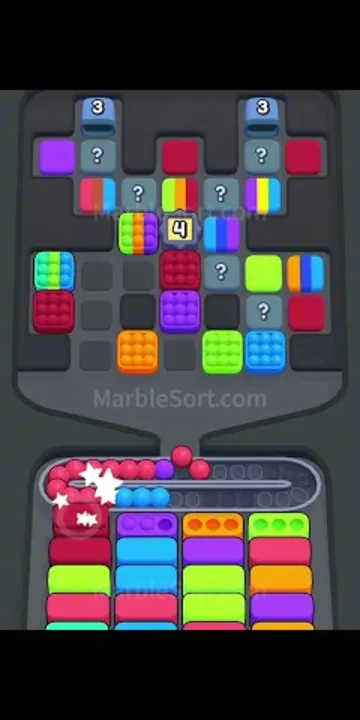
Level 367 opens on the tile-grid variant of Marble Sort, and the first thing you notice is how much of the tray you cannot read. Grey ’?’ mystery tiles sit over several slots across the middle band of the board, so the opening shape is a scattering of honest tiles around a wall of unknowns. The exposed stacks mix Red, Purple, Blue, Green, Yellow, and Orange at different heights, with lighter shades waiting in the lower rows.
Red is the color of the opening. The conveyor is already loaded before your first tap — a run of Reds rides the front of the track with a single Purple mixed in near the end — and more Reds sit exposed at several heights in the tray. That makes the early game look simple, but the board is not offering you one clean color: Blue tiles wait on a lower segment of the track, and the rest of the conveyor keeps cycling whether you tap or not.
The center column holds the level’s prize. A white tile marked with a black “4” sits near the top of the middle stack, the same numbered release tile seen on the hardest boards — tap it at the right moment and it pays several tiles into one receiver. Everything about Level 367 is about timing: reveal the ’?’ tiles when you can afford what is underneath, feed the colors the receivers actually ask for, and save the “4” marker for the Box that is front and center.
The Trap in Marble Sort Level 367
The board is rigged to make you reveal faster than you can sort. Here is the layout:
- The middle of the tray starts under ’?’ tiles: several grey mystery slots sit across the center columns, so the colors that will define the midgame are hidden from the first frame. Every reveal is a gamble until you see what is under it.
- The conveyor opens on a Red run with a Purple stowaway: the Reds have receivers from the start, but the Purple riding with them does not — park it early and it jams the belt while the Reds pile up behind it.
- The numbered ‘4’ marker pays big and fast: the white marker tile on the center column releases several tiles in one drop. Tap it with no matching Box open and the whole payout lands on a full queue.
- The feed rotates underneath you: the opening is Red-led, but by the midgame the belt switches to long Green runs with Purples mixed in. Colors that dominated the opening become rare, and the stacks still hold Reds you have to finish by hand.
Step-by-Step Walkthrough
Feed the colors with open receivers and reveal the board on your terms. Follow the release order.
Opening: ride the Red run
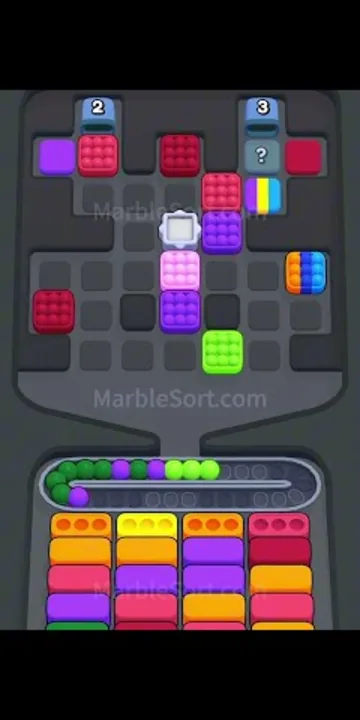
- Start feeding Red as soon as the level begins — the front of the conveyor is a run of Reds and the opening receivers take them, so the first several taps are pure progress.
- Let the lone Purple that rides with the opening Reds pass on the belt. No Purple receiver is live yet, and the belt will keep feeding it whether you tap it or not.
- Peel the exposed Reds off the tray stacks as the belt run thins — Red sits at several heights in the columns, so work each stack down one tile at a time.
- Leave the Blue, Green, Yellow, and Orange tiles alone for now. They sit in the lower rows with no open receiver, and parking one costs you the belt space the Reds need.
- Treat every ’?’ mystery tile as an unknown: drop a revealed tile only when its color matches a receiver slot in the front row, and leave the column alone otherwise.
Midgame: bank the marker and follow the new wave
By the middle of the solve the opening Reds are mostly home and the conveyor turns over. The belt is running a long Green wave with Purples mixed in, the receivers have rotated toward the colors you left parked, and the remaining stacks are heavy with Red and Purple blocks plus a Pink block and a mixed Orange-Blue block lower down.
- Bank the numbered ‘4’ marker on the center column the moment one of its colors has a live Box in the front row — it delivers several tiles into that Box in a single drop.
- Let the Green wave through as its receivers open; Greens arrive in long runs, so feed a whole batch in one pass instead of dribbling singles.
- Catch the Purples as they ride between the Greens — Purple finally has homes now, and clearing it off the belt keeps the queue from backing up behind the Green runs.
- Finish off the remaining Reds by hand from the upper stacks, then clear the Pink block and the mixed Orange-Blue block as their receivers cycle forward.
- Keep the belt fed only with colors that have an open receiver. If a color you no longer need rides the line, let it cycle around instead of forcing it into a stack.
Cleanup: drain the last stacks
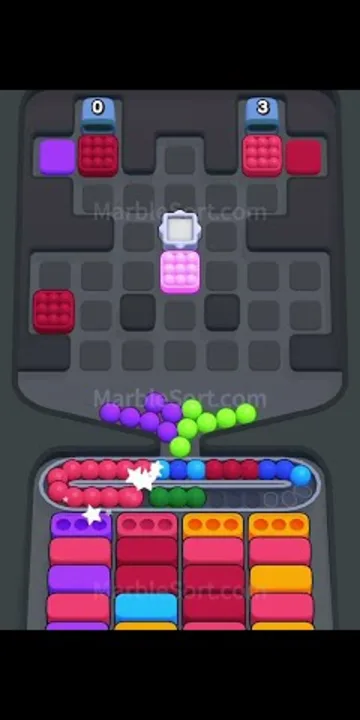
The closing frames of the run catch the board mid-solve with no victory screen — a few short stacks of Purple, Pink, Orange, and Red remain, sparkles still landing on recent drops, and marbles still funneling down toward the receivers.
- Play only to the receiver slots that are still open. Every remaining tile is a single waiting for its Box to slide to the front, so do not chase colors whose receivers have already closed.
- Peel the short stacks one tile at a time from the top — the final Purples, Pinks, Oranges, and Reds finish in short runs as their Boxes reach the front row.
- Let the funnel do the last work: the marbles still dropping cycle into the remaining receivers on their own as slots clear.
- Keep the queue from jamming to the very end. The level completes the moment the last tile lands — there is no reward frame in the footage, so finish the run patiently.
Tips Recap
- Red opens the level: ride the front-of-belt Red run, but let the Purple stowaway pass until its receiver is live.
- Reveal the grey ’?’ mystery tiles one at a time and only drop matches — never gamble a combo on a color you cannot see.
- Bank the numbered ‘4’ marker until a matching Box sits in the front row — it pays several tiles in a single drop.
- The feed rotates from Red to Green and Purple by the midgame; follow the wave, feed whole batches, and drain the last short stacks to close the level.
Related Articles
blog
Marble Sort Mystery Box Guide: Reveal Before You Tap
Learn how the Marble Sort Mystery Box works: how it reveals its color as it moves forward, when it's safe to tap, and how to dodge the wrong-color trap.
blog
Marble Sort Video Walkthroughs — All Levels on YouTube
Every Marble Sort level 1-20 solved on video — the complete walkthrough series by Rock Gaming Channel, embedded level by level with links to the written guides.
level
Marble Sort Level 1 Walkthrough & Solution
Marble Sort Level 1 walkthrough: dodge the checkerboard bait, tap the front Yellow blockers first, and dig out the buried Light Blue clusters step by step.
Was this helpful?
Thanks for the feedback!