Marble Sort Level 426 Walkthrough & Solution
Marble Sort Level 426 walkthrough: six receivers sit one tile short while the center crate locks Red and Orange; feed the reachable one-short Boxes first.
Levels · 426
Levels 460–460
Levels 487–487
Levels 500–500
Levels 517–517
Levels 550–550

Marble Sort Level 426 Walkthrough & Solution
Level 426 Board Overview: The Almost-Finished Receivers
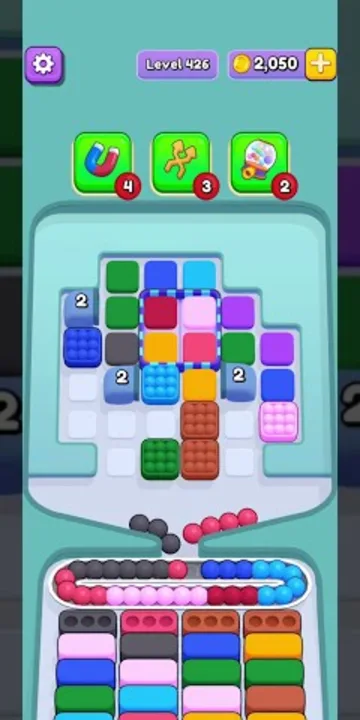
Level 426 is a late-game board that inverts the usual opening puzzle. The front row of receiver Boxes is already nearly full: Grey, Red, Green, Yellow, Blue, and Orange each hold three matching tiles and want exactly one more apiece, the Pink Box has barely been started, and the last Box sits completely empty. On a normal level you build receivers from nothing; here the whole opening is a hunt for a handful of specific tiles hiding inside a cluttered tray.
The grid above the receivers is still packed. Stacks of Green, Dark Blue, Light Blue, Purple, Grey, Yellow, and Brown crowd the columns, with pink and magenta shades sprinkled through the middle rows. Several stacks wear number badges — the ‘2’-badged Dark Blue and Light Blue stacks unload two tiles in a single drop instead of one. Right in the center of the grid, a dashed crate seals off a 2×2 block and locks four tiles inside it, Red, Orange, and both pink shades among them. Nothing trapped under the crate can move until that lock clears.
The feed queue is already loaded too, and none of its early runs match the Boxes that matter. That mismatch is the whole level: the one-short receivers can only be finished by colors that are scattered across the tray or locked under the crate, while the surplus colors in reach — Purple, Brown, and the extra Light Blues — have no open Box at all.
The Trap in Marble Sort Level 426
The board is rigged to make you feed whatever is nearest instead of whatever is needed. Here is the layout:
- Six receivers are one tile from done, and the finishing tiles are the hard part: Grey, Red, Green, Yellow, Blue, and Orange already show three tiles each. Grey and Green are reachable right away; Red and Orange only exist under the crate, so their Boxes sit and wait.
- The crate locks the center of the grid: the dashed 2×2 box seals Red, Orange, and the pink shades mid-board. You cannot plan around the middle columns until the lock opens, which makes the two flanks play independently for the entire opening.
- Number-badged stacks drop in twos: the ‘2’-badged Dark Blue and Light Blue stacks pay two tiles at once. Point them at a Box with room for two; spend them on a one-short Box and you waste most of the drop.
- Purple and Brown have no Box in the opening row: both sit in reach from the start, and tapping either one just parks junk on the belt while the real finishers stay buried.
Marble Sort Level 426 Step-by-Step Walkthrough
Every completed Box rotates the row toward new colors, so the order matters more than speed. Follow the release order.
Opening: finish the reachable one-shorts
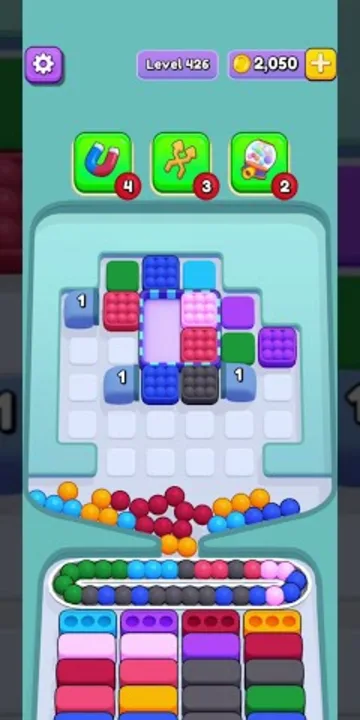
- Feed the Grey tile in the lower-left of the tray into the Grey Box first — it is the cleanest one-tap finish on the board and clears the first receiver.
- Complete the Green Box with a single tile. Greens sit in a pair near the top-left and again down the right side, so one reachable tap closes the Box.
- Finish the Yellow Box with one of the two Yellows parked mid-right on the tray.
- Take the Dark Blue singles at the top-middle and right side and drop one into the Blue Box. Use a plain single, not a 2-badged stack — this Box only wants one tile.
- Leave Red and Orange completely alone. Both colors live inside the center crate, and their one-short Boxes simply cannot be fed yet.
- Do not touch Purple, Brown, the loose Light Blues, or the ‘2’-badged stacks during the opening. None of them have a live Box, so every one you release steals belt space from the finishers above.
Midgame: the crate opens and the row cycles
Once the reachable one-shorts clear, the front row cycles and the crate unlocks — suddenly the colors you have been ignoring all have homes.
- The moment the lock lifts, free the Red and Orange tiles from under the crate and finish their long-waiting Boxes immediately. They have been queued since the opening frame.
- Feed the pink shades from the crate into the barely-started Pink Box, then add the reachable Magenta from the lower-right. This is the one Box that wants a real stack of tiles, so it is worth several midgame moves.
- Bank the ‘2’-badged Dark Blue and Light Blue stacks now that Boxes with room for two have cycled in — each badge clears two slots in a single drop and empties a column fast.
- Ride the feed queue in batches instead of grabbing singles: when a run of one color arrives and its Box is open, let the whole batch fall through and finish the receiver in one pass.
- Feed Purple and Brown the moment their Boxes open — both have sat on the tray since the start, and clearing them empties the lower-middle of the grid.
- Keep working columns top-down as the tray thins, peeling one layer at a time and dropping each tile the instant its color is live in the front row.
Cleanup: the final stragglers
The late frames show the grid nearly stripped: just a handful of single tiles and one-stack columns remain above the receivers, with the crate slot already long empty. The recorded run ends on the level map with Level 427 already flagged Hard, so the last few tiles finish just past the final board frame — keep the same discipline to the end.
- Play only to the active front row from here. Every remaining tile is a single waiting for its Box to slide forward, so never release a color whose receiver is not open.
- Close out each nearly-full Box one at a time as the row cycles, feed the last Light Blues and pinks when their receivers appear, and let the final matching drop end the level.
Level 426 Tips Recap
- Read the one-short receivers first — Grey, Green, Yellow, and Blue finish in the opening; Red and Orange must wait for the crate unlock.
- Never spend a ‘2’-badged stack on a Box that only wants one tile — save double drops for receivers with room for two.
- The center crate splits the board: play the left and right flanks independently until the lock lifts, then clear Red and Orange instantly.
- Purple, Brown, and the loose Light Blues are opening bait with no Box — ignore them until their receivers cycle in.
Related Articles
blog
Marble Sort Dispensers & Locks Guide: Key Order
Learn how Dispensers and Locks work in Marble Sort: find the hidden Key, use Pop-It and Numbered Dispensers without clogging the belt, and beat Level 805.
blog
Marble Sort Locked Pallet Guide: Key Queue Timing
Master the Locked Pallet in Marble Sort: how the key queue works, why keys ignore color, and the timing tricks that stop locked boxes from stalling your run.
blog
Marble Sort Video Walkthroughs — All Levels on YouTube
Every Marble Sort level 1-20 solved on video — the complete walkthrough series by Rock Gaming Channel, embedded level by level with links to the written guides.
Was this helpful?
Thanks for the feedback!